
Contents
- What you’ll learn
- Additional prerequisites
- Getting started
- Building your InstantOn image
- Creating a Kubernetes cluster on EKS
- Installing the Operator
- Deploying your InstantOn image to Amazon Elastic Container Service for Kubernetes (EKS)
- Testing microservices that are running on AWS EKS
- Tearing down the environment
- Great work! You’re done!
- Guide Attribution
Tags
Speeding up startup and improving CPU and memory usage of containers on Amazon Web Services
Prerequisites:
Table of contents
Explore how to speed up your containers startup time by using Open Liberty InstantOn and improve the CPU and memory usage by enabling Semeru Cloud Compiler in your deployment to Amazon Elastic Container Service for Kubernetes (EKS) on Amazon Web Services (AWS).
What you’ll learn
You will learn how to containize a microservice with Open Liberty InstantOn and deploy the container with Semeru Cloud Compiler enablement to a Kubernetes cluster on Amazon Elastic Container Service for Kubernetes (EKS).
Open Liberty InstantOn provides fast startup times for MicroProfile and Jakarta EE applications. Your applications can start in milliseconds, without compromising on throughput, memory, development-production parity, or Java language features.
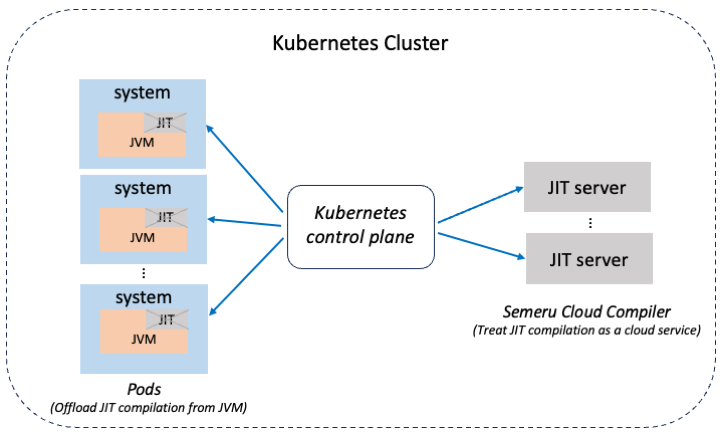
Semeru Cloud Compiler uses the JITServer (Just-in-Time Server) technology that is included in the Eclipse OpenJ9 JVM. It decouples the JIT compiler from the JVM to prevent your Java application from suffering possible negative effects due to CPU and memory consumption caused by JIT compilation in the JVM.
Amazon Web Services (AWS) offers a managed Kubernetes service called Amazon Elastic Container Service for kubernetes (EKS). EKS simplifies the process of running Kubernetes on AWS without needing to install or maintain your Kubernetes control plane. It provides a hosted kubernetes cluster where you can deploy your microservices. You will use EKS with Amazon Elastic Container Registry (ECR). Amazon ECR is a private registry that is used to store and distribute your container images. Note, because EKS is not free, there is a small cost that is associated with running this guide. See the official Amazon EKS pricing documentation for more information.
The microservice you will deploy is called system. The system microservice returns the JVM system properties of the running container. It also returns the pod’s name in the HTTP header, making replicas easy to distinguish from each other.
Additional prerequisites
You must run this guide in a Linux environment with the X86-64/AMD64 processor and the following version:
-
Ubuntu: kernel version must be 5.9 or greater
-
RHEL: version must be 9.0 or greater
Before you begin, the following additional tools need to be installed on your Linux:
-
Podman: You need containerization software for building containers. Kubernetes supports various container types, but you will need the latest available version of Podman in this guide. For installation instructions, refer to the official https://podman.io/docs/installation documentation.
-
kubectl: You need the Kubernetes command-line tool
kubectlto interact with your Kubernetes cluster. See the official Install and Set Up kubectl documentation for information about downloading and setting upkubectlon your platform. -
IAM Authenticator: You need to install the AWS IAM Authenticator for Kubernetes to allow IAM authentication for your Amazon EKS cluster. Follow the Installing aws-iam-authenticator instructions to install the AWS IAM Authenticator on your platform.
-
eksctl: In this guide, you will need to use the
eksctlCommand Line Interface (CLI) tool for provisioning your EKS cluster. Navigate to the eksctl releases page and download the latest stable release. Extract the archive and add the directory with the extracted files to your path. -
AWS CLI: You will need to use the AWS Command Line Interface (CLI). For this guide, use AWS CLI Version 2, which is intended for use in production environment. All installers for AWS CLI version 2 include and use an embedded copy of Python, independent of any other Python version that you might have installed. Install the AWS CLI by following the instructions in the official Installing the AWS CLI documentation.
Getting started
The fastest way to work through this guide is to clone the Git repository and use the projects that are provided inside:
git clone https://github.com/openliberty/guide-instanton-aws.git
cd guide-instanton-aws
The start directory contains the starting project that you will build upon.
The finish directory contains the finished project that you will build.
Before you begin, make sure you have all the necessary prerequisites.
Building your InstantOn image
To speed up your container startup time, build your container image with the Open Liberty InstantOn.
Navigate to the start directory. Run the following command to build and package the system microservice to a war file:
mvn packageTo containize your microservice, use the kernel-slim-java17-openj9-ubi Liberty container image that uses the Open Liberty basic runtime with the Semeru Runtime 17.
Create theContainerfile.system/Containerfile
Containerfile
 1# tag::kernel-slim[]
 2FROM icr.io/appcafe/open-liberty:kernel-slim-java17-openj9-ubi
 3# end::kernel-slim[]
 4
 5ARG VERSION=1.0
 6ARG REVISION=SNAPSHOT
 7LABEL \
 8  org.opencontainers.image.authors="Your Name" \
 9  org.opencontainers.image.vendor="Open Liberty" \
10  org.opencontainers.image.url="local" \
11  org.opencontainers.image.source="https://github.com/OpenLiberty/guide-instanton-aws" \
12  org.opencontainers.image.version="$VERSION" \
13  org.opencontainers.image.revision="$REVISION" \
14  vendor="Open Liberty" \
15  name="system" \
16  version="$VERSION-$REVISION" \
17  summary="The system microservice from the InstantOn AWS guide" \
18  description="This image contains the system microservice running with the Open Liberty runtime."
19
20# tag::config[]
21COPY --chown=1001:0 src/main/liberty/config/ /config/
22# end::config[]
23# tag::features[]
24RUN features.sh
25# end::features[]
26# tag::war[]
27COPY --chown=1001:0 target/guide-instanton-aws-system.war /config/apps
28# end::war[]
29# tag::configure[]
30RUN configure.sh
31# end::configure[]
32
33# tag::checkpoint[]
34RUN checkpoint.sh afterAppStart
35# end::checkpoint[]
Starting from the kernel-slim-java17-openj9-ubi Liberty container image, build the container image by copying the local config directory to the container config directory, running the features.sh script to add the Liberty features that your microservice is required to operate, copying your microservice war file, and running the configure.sh script to get a pre-warmed container image.
Finally, run the checkpoint.sh script to make a checkpoint. The execution of the checkpoint.sh must be the last instruction during your container image build. This configuration performs the application process checkpoint and stores the process data as the last layer of the application container image. In this guide, use the afterAppStart checkpoint option. For more information about the checkpoint options, see the Faster startup with InstantOn documentation.
Use the following command to build the InstantOn container image. To grant the necessary Linux capabilities to the container image build, this command must be run either as the root user or by using the sudo utility.
podman build \
   -t dev.local/system:1.0-SNAPSHOT \
   --cap-add=CHECKPOINT_RESTORE \
   --cap-add=SYS_PTRACE \
   --cap-add=SETPCAP \
   --security-opt seccomp=unconfined \
   system/.
The three --cap-add options grant the three Linux capabilities that CRIU requires to perform the application process checkpoint during the container image build. The --security-opt option grants access to all Linux system calls to the container image build.
For more information to build the InstantOn image by Docker, see the Building the InstantOn image by using the three-step process with Docker or Podman documentation.
To verify that the image is built, run the following command to list all local container images:
podman imagesVerify that the system:1.0-SNAPSHOT image is listed among them, for example:
REPOSITORY                        TAG
dev.local/system                  1.0-SNAPSHOT
icr.io/appcafe/open-liberty       kernel-slim-java17-openj9-ubi
If you don’t see the system:1.0-SNAPSHOT image, then check the Maven build log for any potential errors.
Now, you can run your InstantOn container image locally by the following command:
podman run \
  --rm \
  --cap-add=CHECKPOINT_RESTORE \
  --cap-add=SETPCAP \
  --security-opt seccomp=unconfined \
  -p 9080:9080 \
  system:1.0-SNAPSHOT
The --cap-add option grants the CHECKPOINT_RESTORE and SETPCAP capabilities. The SYS_PTRACE capability is not required to run the InstantOn container image.
After you see the following message, your application server is ready:
[AUDIT ] CWWKF0011I: The defaultServer server is ready to run a smarter planet. The defaultServer server started in 0.298 seconds.Notice that the startup time is less than 1 second. Point your browser to the http://localhost:9080/system/properties URL. You see a result in JSON format with the system properties of your container JVM. After you finish checking out the application, stop the Open Liberty server by pressing CTRL+C in the command-line session where you ran the container.
Creating a Kubernetes cluster on EKS
Before you can deploy your microservice, you must create a Kubernetes cluster.
Configuring the AWS CLI
Before you configure the AWS CLI, you need to create an AWS Identity and Access Management (IAM) user. Navigate to the Identity and Access Management users dashboard and create a user through the UI. While creating a user, you must give the user programmatic access when selecting the AWS access type. You will also be prompted to add the user to a group. A group allows you to specify permissions for multiple users. If you do not have an existing group, you need to create a new one. Be sure to take note of the AWS Access Key ID and AWS Secret Access Key. After the AWS CLI is installed, it must be configured by running the AWS configure command.
You will be prompted for several pieces of information, including an AWS Access Key ID and an AWS Secret Access Key. These keys are associated with the AWS Identity and Access Management (IAM) user that you created.
aws configureNext, you will be prompted to enter a region. This region will be the region of the servers where your requests are sent. Select the region that is closest to you. For a full list of regions, see the AWS Regions and Endpoints.
Finally, enter json when you are prompted to enter the output format.
After you are done filling out this information, the settings are stored in the default profile. Anytime that you run an AWS CLI command without specifying a profile, the default profile is used.
You can verify your current configuration values by running the following command:
aws configure list Name Value Type Location
---- ----- ---- --------
profile <not set> None None
access_key ****************OABC shared-credentials-file
secret_key ****************ABc0 shared-credentials-file
region us-east-2 config-file ~/.aws/configProvisioning a cluster
The eksctl CLI tool greatly simplifies the process of creating clusters on EKS. To create your cluster, use the eksctl create cluster command:
eksctl create cluster --name=guide-cluster --nodes=1 --node-type=t2.smallRunning this command creates a cluster that is called guide-cluster that uses a single t2.small Amazon Elastic Compute Cloud (EC2) instance as the worker node. The t2.small EC2 instance is not included in the AWS free tier. See the official Amazon EC2 pricing documentation for more details. When the cluster is created, you see an output similar to the following:
[✔] EKS cluster "guide-cluster" in "us-east-2" region is readyAfter your cluster is ready, EKS connects kubectl to the cluster. Verify that you’re connected to the cluster by checking the cluster’s nodes:
kubectl get nodesNAME STATUS ROLES AGE VERSION
ip.us-east-2.compute.internal Ready <none> 7m v1.11.5Installing the Operator
Before you can deploy your microservice, you must install the cert-manager and the Open Liberty Operator. For more information, see the installation instructions.
First, install the cert-manager to your Kubernetes cluster by running the following command:
kubectl apply -f https://github.com/cert-manager/cert-manager/releases/download/v1.12.1/cert-manager.yamlNext, install Custom Resource Definitions (CRDs) for the Open Liberty Operator by running the following command:
kubectl apply --server-side -f https://raw.githubusercontent.com/OpenLiberty/open-liberty-operator/main/deploy/releases/1.2.1/kubectl/openliberty-app-crd.yamlCustom Resources extend the Kubernetes API and enhance its functionality.
Set environment variables for namespaces for the Operator by running the following commands:
OPERATOR_NAMESPACE=default
WATCH_NAMESPACE='""'
Next, run the following commands to install cluster-level role-based access:
curl -L https://raw.githubusercontent.com/OpenLiberty/open-liberty-operator/main/deploy/releases/1.2.1/kubectl/openliberty-app-rbac-watch-all.yaml \
  | sed -e "s/OPEN_LIBERTY_OPERATOR_NAMESPACE/${OPERATOR_NAMESPACE}/" \
  | kubectl apply -f -
Finally, run the following commands to install the Operator:
curl -L https://raw.githubusercontent.com/OpenLiberty/open-liberty-operator/main/deploy/releases/1.2.1/kubectl/openliberty-app-operator.yaml \
  | sed -e "s/OPEN_LIBERTY_WATCH_NAMESPACE/${WATCH_NAMESPACE}/" \
  | kubectl apply -n ${OPERATOR_NAMESPACE} -f -
To check that the Open Liberty Operator has been installed successfully, run the following command to view all the supported API resources that are available through the Open Liberty Operator:
kubectl api-resources --api-group=apps.openliberty.ioLook for the following output, which shows the custom resource definitions (CRDs) that can be used by the Open Liberty Operator:
NAME                      SHORTNAMES         APIGROUP              NAMESPACED   KIND
openlibertyapplications   olapp,olapps       apps.openliberty.io   true         OpenLibertyApplication
openlibertydumps          oldump,oldumps     apps.openliberty.io   true         OpenLibertyDump
openlibertytraces         oltrace,oltraces   apps.openliberty.io   true         OpenLibertyTrace
Each CRD defines a kind of object that can be used, which is specified in the previous example by the KIND value. The SHORTNAME value specifies alternative names that you can substitute in the configuration to refer to an object kind. For example, you can refer to the OpenLibertyApplication object kind by one of its specified shortnames, such as olapps.
The openlibertyapplications CRD defines a set of configurations for deploying an Open Liberty-based application, including the application image, number of instances, and storage settings. The Open Liberty Operator watches for changes to instances of the OpenLibertyApplication object kind and creates Kubernetes resources that are based on the configuration that is defined in the CRD.
Deploying your InstantOn image to Amazon Elastic Container Service for Kubernetes (EKS)
In this section, you will learn how to push your InstantOn image built in the previous section to a container registry, and then deploy it to your Kubernetes cluster on EKS by using Open Liberty Operator with Semeru Cloud Compiler enablement.
Pushing the image to a container registry
Pushing the image to a registry allows the cluster to create pods by using your container image. The registry that you are using is called Amazon Elastic Container Registry (ECR).
Authenticate to the registry using the following command so you can push or pull image using Podman:
Start by running the get-login command. The get-login command returns the [password_string]. The password-stdin flag provides the password returned by get-login. Replace the [aws_account_id] and the [region] your account is configured under in the following podman command, that is used to authenticate your Podman client.
aws ecr get-login-password | podman login --username AWS --password-stdin [aws_account_id].dkr.ecr.[region].amazonaws.comAfter you are authenticated, create a repository for the instanton container image, in the private Amazon ECR registry.
Next, make a repository to store the system image:
aws ecr create-repository --repository-name instantonaws/systemYou will see an output similar to the following:
{
    "repository": {
        "repositoryArn": "arn:aws:ecr:us-east-2:439159788015:repository/instantonaws/system",
        "registryId": "439159788015",
        "repositoryName": "instantonaws/system",
        "repositoryUri": "439159788015.dkr.ecr.us-east-2.amazonaws.com/instantonaws/system",
        "createdAt": "2023-07-20T10:30:04-07:00",
    ...
}
Next, you need to tag your container image with the relevant data about your registry:
podman tag dev.local/system:1.0-SNAPSHOT [system-repository-uri]:1.0-SNAPSHOTFinally, push your image to the registry:
podman push [system-repository-uri]:1.0-SNAPSHOTDeploying the image
You can configure the specifics of the Open Liberty Operator-controlled deployment with a YAML configuration file.
Create the deploy.yaml configuration file in the start directory.
deploy.yaml
deploy.yaml
 1# tag::system[]
 2apiVersion: apps.openliberty.io/v1
 3# tag::olapp[]
 4kind: OpenLibertyApplication
 5# end::olapp[]
 6metadata:
 7  name: system
 8spec:
 9  # tag::sysImage[]
10  applicationImage: [system-repository-uri]:1.0-SNAPSHOT
11  # end::sysImage[]
12  pullPolicy: Always
13  manageTLS: false
14  replicas: 3
15  resources:
16    limits:
17      cpu: 1
18      memory: 512Mi
19    requests:
20      cpu: 500m
21      memory: 256Mi
22  service:
23    type: ClusterIP
24    port: 9443
25  expose: true
26  env:
27    - name: WLP_LOGGING_MESSAGE_FORMAT
28      value: "json"
29    - name: WLP_LOGGING_MESSAGE_SOURCE
30      value: "message,trace,accessLog,ffdc,audit"
31  # tag::securityContext[]
32  securityContext:
33    runAsNonRoot: true
34    privileged: false
35    allowPrivilegeEscalation: true
36    capabilities:
37      add:
38      - CHECKPOINT_RESTORE
39      - SETPCAP
40      drop:
41      - ALL
42  # end::securityContext[]
43  # tag::semeruCloudCompiler[]
44  semeruCloudCompiler:
45    enable: true
46    replicas: 3
47  # end::semeruCloudCompiler[]
48# end::system[]
The deploy.yaml file is configured to deploy one OpenLibertyApplication resource, system, which is controlled by the Open Liberty Operator.
The applicationImage parameter defines what container image is deployed as part of the OpenLibertyApplication CRD. Update [system-repository-uri] in the applicationImage field to point to your system repository URI.
TODO: need a paragraph to describe securityContext configuration.
TODO: need a paragraph to describe semeruCloudCompiler configuration.
Run the following command to deploy the system InstantOn image:
kubectl apply -f deploy.yamlWhen the image is deployed, run the following command to check the status of your pods:
kubectl get podsIf all the pods are healthy and running, you see an output similar to the following:
NAME                                        READY   STATUS    RESTARTS   AGE
olo-controller-manager-58d7788bd-nk7cc      1/1     Running   0          44m
system-deployment-6d559bbcf9-xt7t6          1/1     Running   0          8m40s
system-semeru-compiler-1-58666f5d56-dmhm8   0/1     Pending   0          2m39s
system-semeru-compiler-1-58666f5d56-hs85x   1/1     Running   0          2m39s
system-semeru-compiler-1-58666f5d56-s2pds   0/1     Pending   0          2m39s
The first pod refers to the Open Liberty Operator. The second one is the system microservice and the last three for the three replicas of Semeru Cloud Compiler.
To check the Semeru Cloud Compiler and InstantOn deployments, execute the following command:
kubectl get deploymentsNAME READY UP-TO-DATE AVAILABLE AGE
olo-controller-manager 1/1 1 1 50m
system-deployment 1/1 1 1 14m
system-semeru-compiler-1 1/3 3 1 8m56sMaking requests to the microservices
Before you can make a request to [hostname]:31000, you must modify the security group to allow incoming traffic through ports 31000. To get the group-id of the security group, use the aws ec2 describe-security-groups command:
aws ec2 describe-security-groups --filters Name=group-name,Values="*eksctl-guide-cluster-cluster-*" --query "SecurityGroups[*].IpPermissions[*].UserIdGroupPairs"You will see an output similar to the following:
...
    {
        "Description": "Allow nodes to communicate with each other (all ports)",
        "GroupId": "sg-035c858e1ff9c52f1",
        "UserId": "208872073932"
    },
    {
        "Description": "Allow managed and unmanaged nodes to communicate with each other (all ports)",
        "GroupId": "sg-04a0c50049c10ae54",
        "UserId": "208872073932"
    }
...
Copy the value of the GroupId which description is "Allow managed and unmanaged nodes to communicate with each other (all ports)". In this example output, the value is sg-04a0c50049c10ae54.
Then, add the following rules to the security group to allow incoming traffic through port 31000. Don’t forget to substitute [security-group-id] for the GroupId in the output of the previous command.
aws ec2 authorize-security-group-ingress --protocol tcp --port 31000 --group-id [security-group-id] --cidr 0.0.0.0/0After you finish adding the inbound rules to the security group, you might need to wait a few minutes before you try to access the system microservice.
Take note of the EXTERNAL-IP in the output of the following command. It is the hostname you will later substitute into [hostname]:
kubectl get nodes -o wideThen, curl or visit the following URLs to access your microservices, substituting the appropriate hostname:
-
http://[hostname]:31000/system/properties
This URL returns system properties and the name of the pod in an HTTP header called X-Pod-Name. To view the header, you can use the -I option in the curl when you make a request to http://[hostname]:31000/system/properties.
Testing microservices that are running on AWS EKS
pom.xml
  1<?xml version="1.0" encoding="UTF-8"?>
  2<project xmlns="http://maven.apache.org/POM/4.0.0"
  3    xmlns:xsi="http://www.w3.org/2001/XMLSchema-instance"
  4    xsi:schemaLocation="http://maven.apache.org/POM/4.0.0 http://maven.apache.org/xsd/maven-4.0.0.xsd">
  5
  6    <modelVersion>4.0.0</modelVersion>
  7
  8    <groupId>io.openliberty.guides</groupId>
  9
 10    <artifactId>guide-instanton-aws-system</artifactId>
 11    <version>1.0-SNAPSHOT</version>
 12    <packaging>war</packaging>
 13
 14    <properties>
 15        <project.build.sourceEncoding>UTF-8</project.build.sourceEncoding>
 16        <project.reporting.outputEncoding>UTF-8</project.reporting.outputEncoding>
 17        <maven.compiler.source>11</maven.compiler.source>
 18        <maven.compiler.target>11</maven.compiler.target>
 19        <!-- Default test properties -->
 20        <!-- tag::cluster[] -->
 21        <cluster.ip>localhost</cluster.ip>
 22        <!-- end::cluster[] -->
 23        <!-- tag::system-service[] -->
 24         <system.kube.service>system-service</system.kube.service>
 25         <!-- end::system-service[] -->
 26         <!-- tag::system-node-port[] -->
 27        <system.node.port>31000</system.node.port>
 28        <!-- end::system-node-port[] -->
 29        <!-- Liberty configuration[] -->
 30        <liberty.var.default.http.port>9080</liberty.var.default.http.port>
 31        <liberty.var.default.https.port>9443</liberty.var.default.https.port>
 32    </properties>
 33
 34    <!-- Provided dependancies -->
 35    <dependencies>
 36        <dependency>
 37            <groupId>jakarta.platform</groupId>
 38            <artifactId>jakarta.jakartaee-api</artifactId>
 39            <version>10.0.0</version>
 40            <scope>provided</scope>
 41        </dependency>
 42        <dependency>
 43            <groupId>org.eclipse.microprofile</groupId>
 44            <artifactId>microprofile</artifactId>
 45            <version>6.0</version>
 46            <type>pom</type>
 47            <scope>provided</scope>
 48        </dependency>
 49       <!-- For tests -->
 50        <dependency>
 51            <groupId>org.junit.jupiter</groupId>
 52            <artifactId>junit-jupiter</artifactId>
 53            <version>5.9.2</version>
 54            <scope>test</scope>
 55        </dependency>
 56        <dependency>
 57            <groupId>org.jboss.resteasy</groupId>
 58            <artifactId>resteasy-json-binding-provider</artifactId>
 59            <version>6.2.3.Final</version>
 60            <scope>test</scope>
 61        </dependency>
 62        <dependency>
 63            <groupId>org.jboss.resteasy</groupId>
 64            <artifactId>resteasy-client</artifactId>
 65            <version>6.2.3.Final</version>
 66            <scope>test</scope>
 67        </dependency>
 68    </dependencies>
 69
 70    <build>
 71        <finalName>${project.artifactId}</finalName>
 72        <plugins>
 73            <plugin>
 74                <groupId>org.apache.maven.plugins</groupId>
 75                <artifactId>maven-war-plugin</artifactId>
 76                <version>3.3.2</version>
 77            </plugin>
 78            <!-- Enable Liberty Maven plugin -->
 79            <plugin>
 80                <groupId>io.openliberty.tools</groupId>
 81                <artifactId>liberty-maven-plugin</artifactId>
 82                <version>3.8.2</version>
 83            </plugin>
 84            <!-- Plugin to run unit tests -->
 85            <plugin>
 86                <groupId>org.apache.maven.plugins</groupId>
 87                <artifactId>maven-surefire-plugin</artifactId>
 88                <version>3.0.0</version>
 89            </plugin>
 90            <!-- Plugin to run functional tests -->
 91            <plugin>
 92                <groupId>org.apache.maven.plugins</groupId>
 93                <artifactId>maven-failsafe-plugin</artifactId>
 94                <version>3.0.0</version>
 95                <configuration>
 96                    <systemPropertyVariables>
 97                        <cluster.ip>${cluster.ip}</cluster.ip>
 98                        <system.kube.service>${system.kube.service}</system.kube.service>
 99                        <system.node.port>${system.node.port}</system.node.port>
100                    </systemPropertyVariables>
101                </configuration>
102            </plugin>
103        </plugins>
104    </build>
105</project>
A few tests are included for you to test the basic functionality of the microservices. If a test failure occurs, then you might have introduced a bug into the code. To run the tests, wait for all pods to be in the ready state before you proceed further. The default properties defined in the pom.xml file are:
| Property | Description |
|---|---|
|
IP or hostname for your cluster. |
|
Name of the Kubernetes Service wrapping the |
|
The NodePort of the Kubernetes Service |
Use the following command to run the integration tests against your cluster. Substitute [hostname] with the appropriate value:
mvn failsafe:integration-test -Dcluster.ip=[hostname]If the tests pass, you see an output for each service similar to the following:
-------------------------------------------------------
 T E S T S
-------------------------------------------------------
Running it.io.openliberty.guides.system.SystemEndpointIT
Tests run: 2, Failures: 0, Errors: 0, Skipped: 0, Time elapsed: 0.673 sec - in it.io.openliberty.guides.system.SystemEndpointIT

Results:

Tests run: 2, Failures: 0, Errors: 0, Skipped: 0
Tearing down the environment
It is important to clean up your resources when you are finished with the guide so that you do not incur additional charges for ongoing service.
When you no longer need your deployed microservices, you can delete all kubernetes resources by running the kubectl delete command:
kubectl delete -f deploy.yamlDelete the ECR repositories used to store the system image:
aws ecr delete-repository --repository-name instantonaws/system --forceRemove your EKS cluster:
eksctl delete cluster --name guide-clusterGreat work! You’re done!
You just deployed two microservices running in Open Liberty to AWS EKS. You also learned how to use the kubectl command to deploy your microservices on a kubernetes cluster.
Guide Attribution
Speeding up startup and improving CPU and memory usage of containers on Amazon Web Services by Open Liberty is licensed under CC BY-ND 4.0

Copied to clipboard
Prerequisites:
Great work! You're done!
What did you think of this guide?


Thank you for your feedback!
What could make this guide better?
Raise an issue to share feedback
Create a pull request to contribute to this guide
Need help?
Ask a question on Stack Overflow


